There’s something utterly charming about a cookie that looks as delightful as it tastes, and that’s exactly why I adore the Chocolate Mushroom Sugar Cookies Recipe. The rich chocolate edges with a sweet, soft mushroom design inside make each bite a little celebration. You’re going to love how fun and surprisingly easy these slice-and-bake cookies are!

Jump to:
Why You'll Love This Recipe
I still remember the first time I made these Chocolate Mushroom Sugar Cookies, how the chocolate aroma filled my kitchen, and those adorable red-and-white mushrooms brought a nostalgic cottagecore vibe to my cookie jar. Here’s why you’ll want to bake a batch too.
- Slice-and-Bake Convenience: Prep the dough ahead, slice off exactly what you want, and enjoy fresh cookies whenever a craving strikes.
- Perfect Texture Combo: Soft, thick sugar cookie centers surrounded by a rich cocoa-flavored exterior that's tender but with structure.
- Easy Yet Impressive: You don’t have to be a pro baker to create these charming, festive treats that look so fancy.
- Fun Decorating: Little touches like pearl sprinkles and colored sugar take these cookies from cute to absolutely irresistible.
Ingredients & Why They Work
These ingredients play together like a dream to deliver that perfect chocolatey sugar cookie with its whimsical mushroom design. Here’s what to keep in mind when shopping or prepping for this recipe.

- Butter: Use butter that’s barely softened, not super soft—this helps the dough hold shape for slicing and baking.
- Granulated Sugar: Sweetens and adds a bit of texture that balances the cocoa powder’s richness.
- Salt: Just a pinch to amplify all those sweet and chocolatey flavors without making it salty.
- Vanilla Extract: Brings warmth and depth, rounding out the chocolate and sugar.
- Egg: Acts as a binder and helps create that soft, tender crumb.
- All Purpose Flour: The base that gives these cookies structure but keeps them tender.
- Dutch-Processed Cocoa Powder: This gives a deeper chocolate flavor and a rich, dark color to the cookie outside.
- Red Gel Food Coloring: For that vibrant, festive mushroom "cap" that pops so beautifully.
- White Round Pearl Sprinkles: Perfect for the classic mushroom’s white spots—adds texture and whimsy.
- Coarse Sugar: Sprinkled on for crunch and sparkle, elevating the treat visually and taste-wise.
- Powdered Sugar: For the green “stem” icing—it’s smooth, sweet, and easy to pipe or spread.
- Heavy Whipping Cream: Helps thin your powdered sugar glaze to the perfect consistency for decorating.
- Green Gel Food Coloring: Brings that fresh green color to the mushroom stems, keeping your cookies cute and colorful.
Make It Your Way
I love tweaking the colors on these cookies depending on the season—or even swapping out the pearl sprinkles for tiny edible glitter to add sparkle for a party. This recipe really invites you to get playful, so don’t hesitate to make it your own.
- Variation: One winter, I swapped red gel for a pastel pink and added edible snowflake sprinkles for a sweet holiday twist that my kids adored.
- Dietary Mod: You can try using a vegan butter alternative and flax “egg” to make these dairy and egg-free, though the texture will be a bit different.
- Seasonal Twist: Adding a tiny dash of cinnamon or instant coffee powder intensifies the chocolate flavor for cozy fall baking.
- Extra Decorative Flourish: Use colored sanding sugar instead of coarse sugar for a festive shimmer effect.
Step-by-Step: How I Make Chocolate Mushroom Sugar Cookies Recipe

Step 1: Cream the Butter and Sugar
Start by beating the barely softened butter with the granulated sugar and salt until it’s fluffy and pale. This step traps air, helping your cookies rise a little and keep a tender texture. I use a hand mixer because it’s speedy, but a sturdy whisk and some elbow grease works fine too!
Step 2: Add Vanilla and Egg
Beat in the vanilla and the room-temperature egg until smooth. Having your egg warm makes it incorporate easier and prevents the batter from curdling.
Step 3: Mix Dry Ingredients for the Base Dough
Whisk together the flour and cocoa powder in a separate bowl. This helps distribute the cocoa evenly so there are no clumps and the chocolate flavor stays consistent.
Step 4: Combine and Chill Dough
Slowly add the dry ingredients into the wet mixture and stir until just combined. The dough will feel thick and chocolatey. Divide it and wrap tightly in plastic wrap, then chill it in the fridge for at least an hour—this makes slicing easier later, and the flavors meld beautifully.
Step 5: Form the Mushroom Design
This is where the magic happens! Roll out the base dough and shape the mushroom caps with red-colored dough, adding pearl sprinkles as spots. Use the green-glazed powdered sugar as the stem. If you want the full tutorial on decorating the mushroom, I’m happy to share more tips—just ask!
Step 6: Slice, Sprinkle, and Bake
Slice the dough into about ¼-inch thick pieces to reveal the mushroom cross-section before arranging them on a baking sheet. Sprinkle the coarse sugar on top for sparkle and send them to bake at 350°F (175°C) for 8-10 minutes. Watch the edges—they should be set but the centers stay soft.
Top Tip
Over the years making these cookies, I’ve found a few little tricks that make all the difference between good and outstanding cookies.
- Butter Temperature: Don’t let your butter get too soft or melted—that’s a common mistake that can make the dough too sticky and the cookies spread too much.
- Chilling Time: I usually chill the dough overnight if I can—it’s not essential, but the firmness makes slicing perfect cookies effortless.
- Even Slices: Use a sharp knife and try to slice cookies about the same thickness so they bake evenly.
- Watch Your Bake Time: My oven runs hot, so I start checking at 8 minutes to avoid overbaking—cookies should stay soft in the middle.
How to Serve Chocolate Mushroom Sugar Cookies Recipe

Garnishes
I usually keep it simple with a dusting of coarse sugar before baking for that sparkling crunch. But sometimes I’ll add a tiny drizzle of white chocolate over the 'mushroom caps' for extra indulgence and a fancy touch that guests love.
Side Dishes
These cookies pair beautifully with a warm cup of chai tea or classic hot chocolate—perfect for cozy afternoons. If you want to impress at brunch, serve alongside fresh fruit and light whipped cream.
Creative Ways to Present
I like to arrange a stack of these cookies on a rustic wooden board with greenery sprigs for a charming cottagecore vibe. They also make gorgeous edible place cards when tied with twine and a cute tag—ideal for holiday gatherings.
Make Ahead and Storage
Storing Leftovers
Once cooled, I store any leftover cookies in an airtight container at room temperature. They keep their soft texture for about 3-4 days, which is usually not an issue—they’re that good they disappear fast!
Freezing
This is where the slice-and-bake format shines. I freeze the cookie dough logs tightly wrapped in plastic wrap inside a freezer bag. When I want fresh cookies, I just slice and bake straight from frozen—no thawing needed.
Reheating
If you want to rewarm leftover cookies, a quick 10-15 second zap in the microwave or a minute in a low oven does wonders to soften them up again without drying them out.
Frequently Asked Questions:
You can substitute regular cocoa powder, but note that Dutch-processed cocoa has a milder, less acidic flavor and gives a richer color. Your cookies might be slightly lighter and have a different flavor note with regular cocoa, so just adjust to your preference.
Make sure your butter is just barely softened and not melting. Also, chilling the dough well before slicing helps maintain shape. Slicing thickness matters too—too thin slices will spread more. Using a sharp knife for even slices helps keep things uniform in the oven.
You can experiment with a gluten-free all-purpose flour blend, but keep in mind that texture might change slightly. It’s best to use a 1-to-1 gluten-free blend that includes xanthan gum for better hold. Monitor baking time as gluten-free doughs sometimes brown faster.
The mushroom design comes from layering colored dough logs—red for the cap, chocolate base for the background, and adding white pearl sprinkles as dots. Then you use a green glaze made with powdered sugar and food coloring to pipe the stem after baking. Chilling the dough logs before slicing is key to making clean cross-sections.
Final Thoughts
The Chocolate Mushroom Sugar Cookies Recipe holds a special place in my baking repertoire—not just because they taste heavenly but because they bring so much joy in making them. Whether you’re baking for a cozy night in, a festive party, or just because, these cookies bring a bit of magic to the table. Trust me, once you try making these, you’ll be reaching for the dough logs again and again.
Print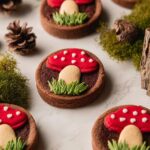
Chocolate Mushroom Sugar Cookies Recipe
- Prep Time: 20 minutes
- Cook Time: 10 minutes
- Total Time: 90 minutes
- Yield: 18 cookies
- Category: Dessert
- Method: Baking
- Cuisine: American
Description
Delight in these charming Mushroom Sugar Cookies featuring a soft, thick sugar cookie base with a luscious chocolate exterior and a whimsical mushroom design at the center. Perfect for slice-and-bake convenience, these cookies are ideal for the holiday season or any cozy occasion, offering an adorable cottagecore aesthetic that's both fun and easy to make.
Ingredients
Cookie Dough
- ¾ cup butter (barely softened - not too soft!)
- ¾ cup granulated sugar
- ¼ teaspoon salt
- 1 teaspoon vanilla extract
- 1 large egg (room temperature)
- 2 cups all purpose flour (240g)
- 2 tablespoons cocoa powder (dutch processed)
Decorations
- Red gel food coloring (as needed)
- White round pearl sprinkles
- ⅓ cup coarse sugar
- ½ cup powdered sugar
- 1-2 tablespoons heavy whipping cream
- Green gel food coloring (as needed)
Instructions
- Prepare the Dough: In a large mixing bowl, cream together the ¾ cup of barely softened butter and ¾ cup granulated sugar until light and fluffy. Add ¼ teaspoon salt, 1 teaspoon vanilla extract, and 1 large room temperature egg, mixing well to combine.
- Incorporate Dry Ingredients: Sift together 2 cups all-purpose flour and 2 tablespoons Dutch-processed cocoa powder. Gradually add the dry mixture to the wet ingredients and mix until just combined, forming the cookie dough.
- Color the Dough: Divide dough as needed to create portions for decorating. Add red gel food coloring to part of the dough for mushroom caps and green gel food coloring to another portion for stems or leaves. Leave some dough plain for the white parts.
- Form Mushroom Shapes: Roll the colored dough portions into logs or desired shapes. Assemble each cookie slice by layering the chocolate dough around the mushroom-shaped colored dough to create the mushroom design visible after slicing.
- Slice and Chill: Slice the assembled dough logs into even ½-inch thick cookies. Chill these slices in the refrigerator or freezer for about 30-45 minutes to maintain their shape during baking.
- Preheat Oven and Prepare Baking Sheet: Preheat your oven to 350°F (175°C). Line baking sheets with parchment paper or silicone mats to prevent sticking.
- Bake the Cookies: Place the chilled cookie slices evenly spaced on the prepared baking sheets. Bake in the preheated oven for 10 minutes or until edges are set but centers remain soft.
- Cool and Decorate: Let the cookies cool on the baking sheet for a few minutes before transferring to a wire rack to cool completely. Optionally, dust with powdered sugar mixed with 1-2 tablespoons of heavy whipping cream for glaze or use coarse sugar for added texture, then add white pearl sprinkles as mushroom spots.
Notes
- These mushroom sugar cookies feature a charming design with a delightful contrast between chocolate dough and colorful mushroom accents.
- Slice and bake style lets you prepare dough ahead and freeze for fresh cookies anytime.
- Ensure butter is barely softened for the right cookie texture—too soft may change dough consistency.
- Use gel food coloring sparingly to avoid making the dough too soft or sticky.
- Chilling dough slices before baking helps keep the mushroom design intact and prevents spreading.
- Customize decorations using different colored sprinkles for personalized mushroom spots.
- Store baked cookies in an airtight container at room temperature for up to a week or freeze for longer storage.
Nutrition
- Serving Size: 1 serving
- Calories: 186 kcal
- Sugar: 15 g
- Sodium: 97 mg
- Fat: 8 g
- Saturated Fat: 5 g
- Unsaturated Fat: 2.4 g
- Trans Fat: 0.3 g
- Carbohydrates: 26 g
- Fiber: 1 g
- Protein: 2 g
- Cholesterol: 30 mg


Leave a Reply