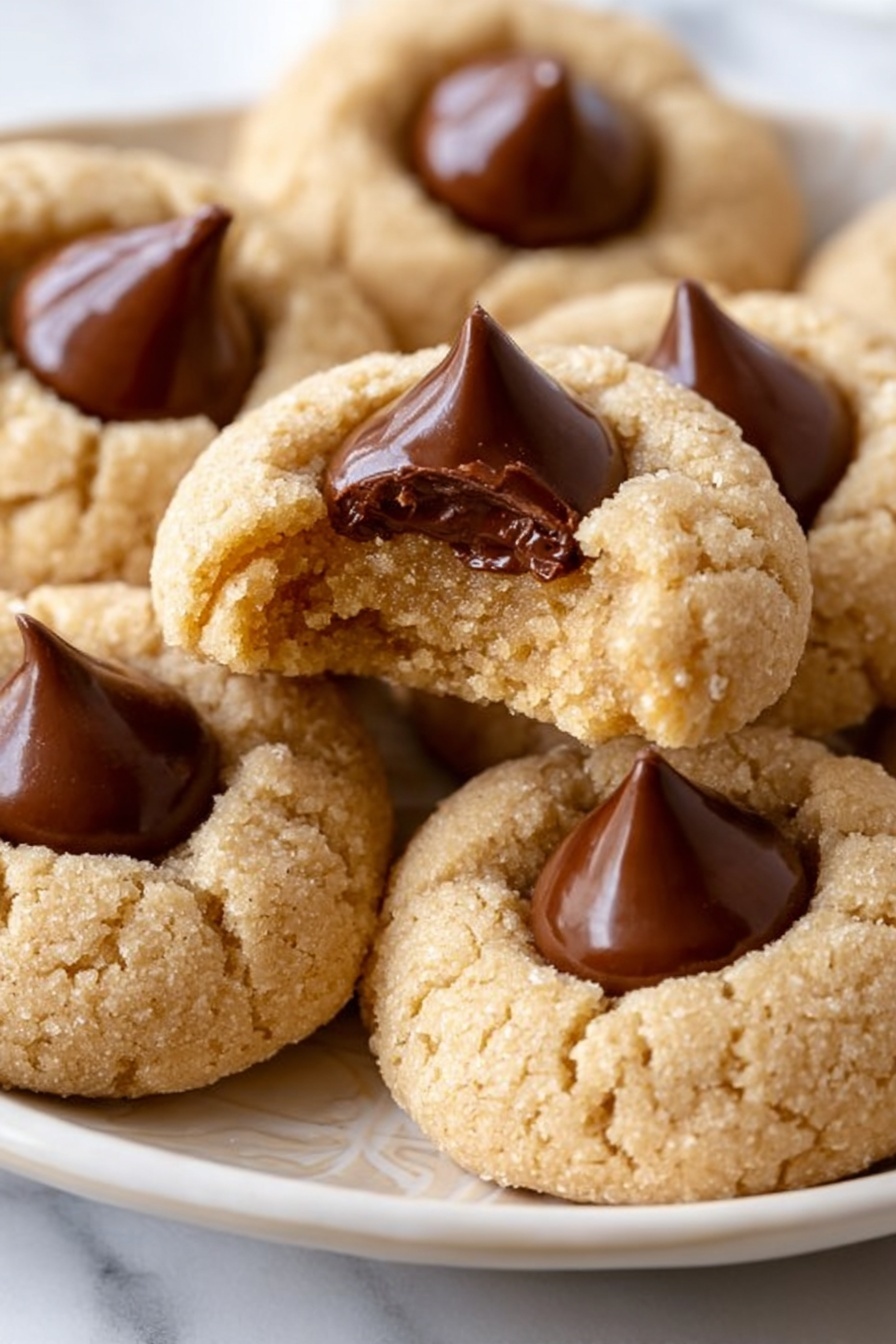
Nothing quite says comfort like the classic combo of peanut butter and chocolate, and that’s exactly what makes this Peanut Butter Blossoms Cookies Recipe so special. When you bite into these soft, chewy cookies crowned with a melty Hershey’s Kiss, it’s pure nostalgic joy every time.

Jump to:
Why You'll Love This Recipe
I’ve made Peanut Butter Blossoms so many times that they feel like an old friend—always reliable and sweetly comforting. This recipe is straightforward, making it perfect for when you want something delicious without fuss. Plus, that kiss on top adds the perfect finishing touch that will have everyone asking for more.
- Classic Flavor Kombination: The perfect balance of creamy peanut butter and rich chocolate in every bite.
- Easy to Make: No complicated steps; just simple mixing and baking that anyone can handle.
- Soft & Chewy Texture: These cookies stay tender and satisfying—no crumbly disappointment here!
- Great for Parties & Gifts: Their adorable look and classic taste make them an instant hit with friends and family.
Ingredients & Why They Work
Each ingredient in this Peanut Butter Blossoms Cookies Recipe plays a role in creating that tender crumb and irresistible flavor. Understanding why helps you nail the texture every time and lets you swap smartly if needed.
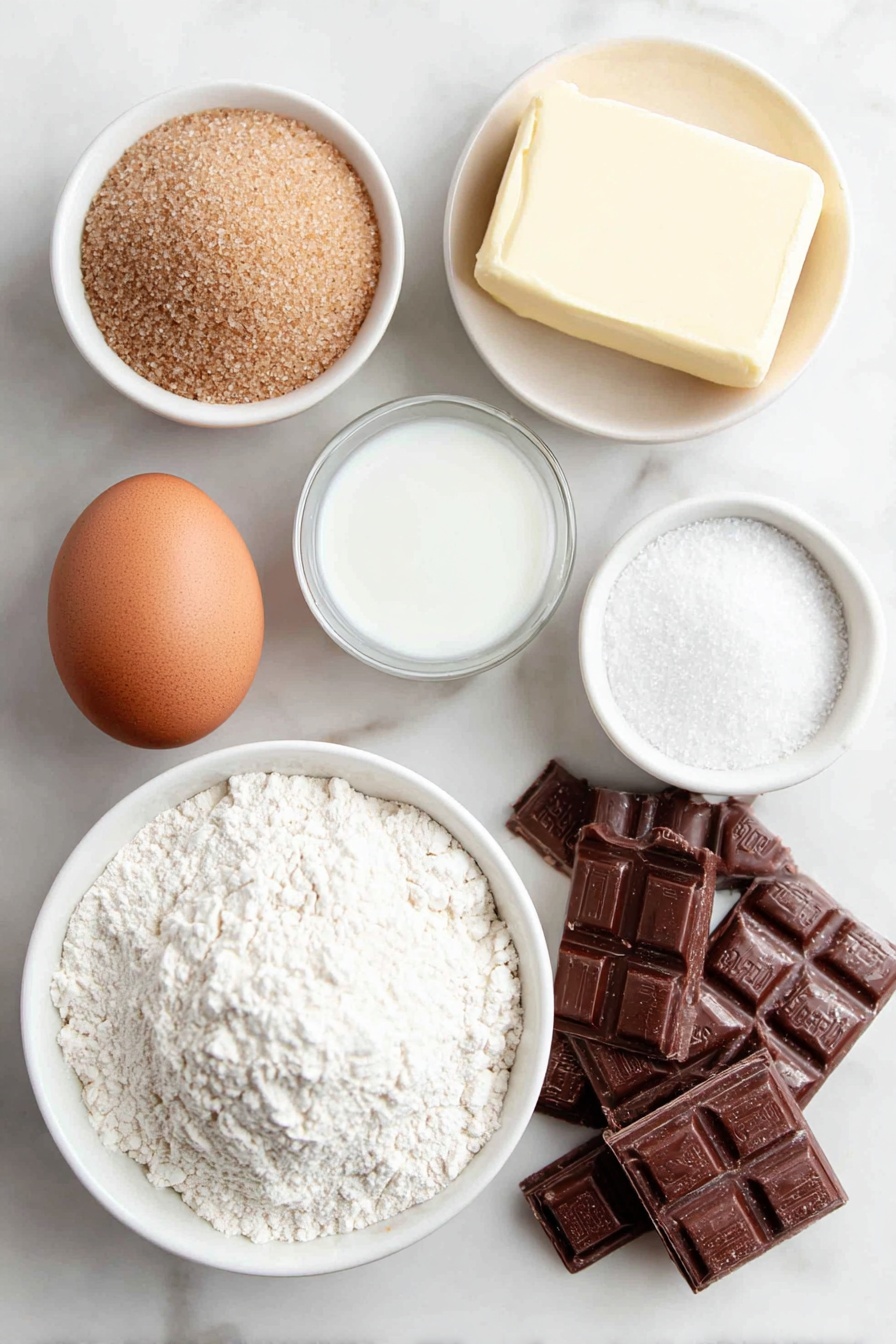
- Unsalted Butter: Softens the dough and adds richness without overpowering the peanut butter.
- Creamy Peanut Butter: The star of the show—provides that classic nutty flavor and moist texture.
- Light Brown Sugar: Adds moisture and a subtle caramel note, keeping cookies chewy.
- Granulated Sugar: Balances sweetness and helps create a slight crisp on the edges.
- Vanilla Extract: Enhances all the flavors without stealing the spotlight.
- Egg: Binds ingredients together and helps leaven the cookies just enough.
- Milk: Keeps the dough soft and adds a touch of tenderness.
- Baking Soda: Gives a gentle rise that makes the cookie light, not cakey.
- Salt: A pinch amps up the sweetness and balances flavors perfectly.
- All-Purpose Flour: The structure-builder, creating that perfect chew without being dense.
- Hershey’s Kisses: The iconic chocolate topping that melts slightly, sealing the deal.
Make It Your Way
I love playing around with this classic recipe depending on the season or crowd—some days I swap in crunchy peanut butter for a nutty crunch or toss in chopped peanuts for extra texture. Don’t hesitate to make it your own!
- Peanut Butter Swap: Using natural peanut butter changes the flavor slightly and adds a wholesome touch, but watch for more oil separation.
- Chocolate Variety: Try mini chocolate chips instead of Kisses for a different texture and extra chocolate punch.
- Nut-Free Version: Substitute sunflower seed butter if you want a nut-free alternative that still delivers richness.
Step-by-Step: How I Make Peanut Butter Blossoms Cookies Recipe
Step 1: Mix the Butters and Sugars
Start by beating softened butter and peanut butter together until smooth. This step’s key because it makes the dough velvety and ensures the sugars dissolve evenly later. Then add your brown and granulated sugars and cream until everything’s fluffy and well combined—usually takes 2-3 minutes on medium speed.
Step 2: Add the Wet Ingredients
Next, beat in the egg, vanilla extract, and milk. This trio binds your dough and adds moisture, so the cookies stay soft and chewy. Mix everything until just combined to avoid overworking the dough.
Step 3: Incorporate Dry Ingredients
Sprinkle in the baking soda and salt, then gradually add the flour, mixing on low speed. Be sure to scrape the bowl sides to catch all that peanut butter goodness. Stop mixing once the dough looks smooth and holds together—overmixing can make the cookies tough.
Step 4: Roll, Sugar, and Bake
Lightly roll tablespoon-sized balls of dough in granulated sugar—this adds a subtle crunch and a glimmering finish. Place the dough balls about 2 inches apart on your lined baking sheets. Then pop them in the oven at 350°F for 9 to 13 minutes, watching for just-golden edges and a matte top (no glossy shine).
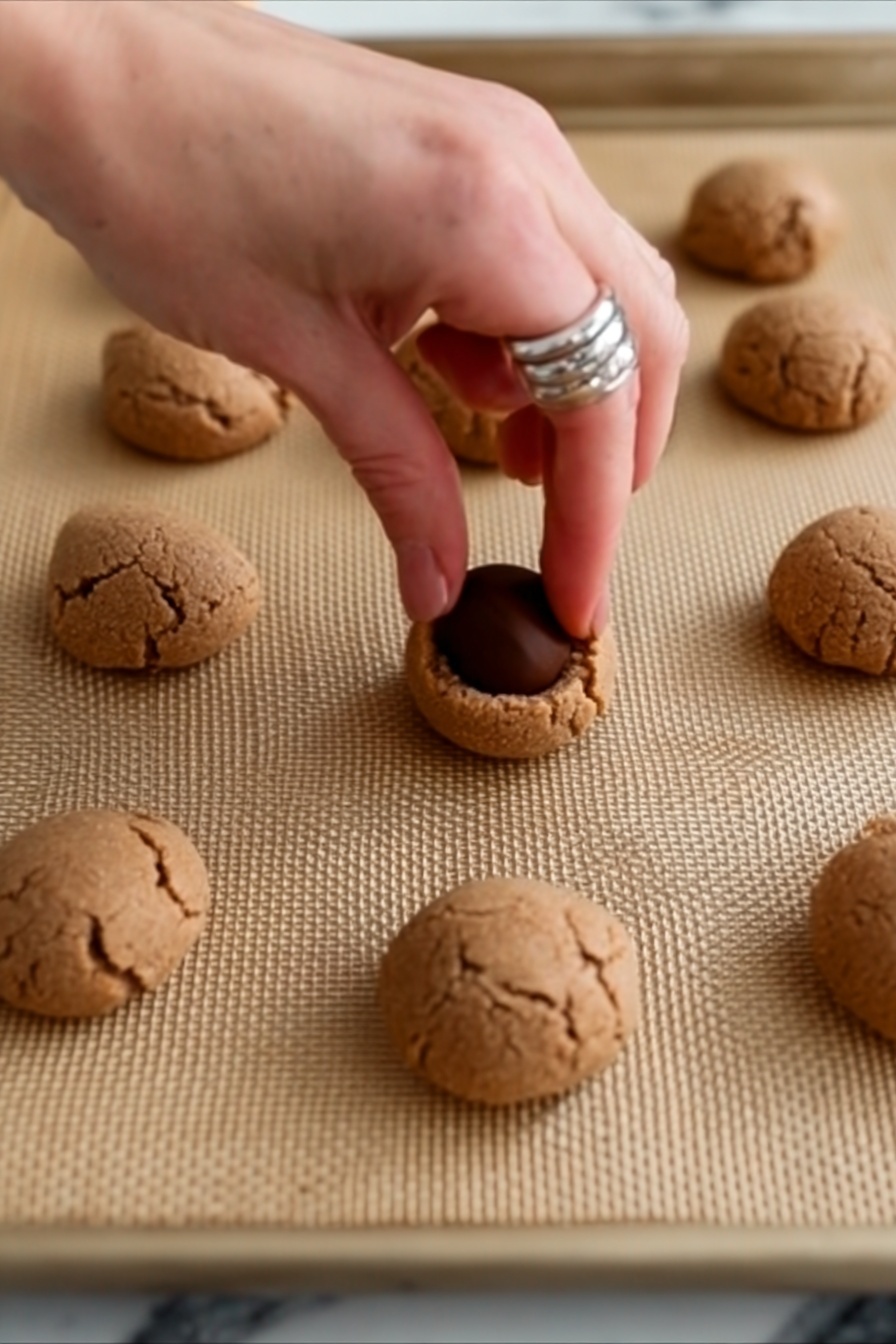
Step 5: Add the Chocolate Kiss
As soon as they come out of the oven, immediately press an unwrapped Hershey’s Kiss into the center of each cookie. The warmth softens the chocolate perfectly—don’t push too hard or the cookie might crack. Let them cool on the pan for a bit and then transfer to a wire rack.
Top Tip
From my many batches of these cookies, I picked up some must-know tips that make all the difference between “meh” and “wow” cookies. Follow these and you'll impress everyone every time.
- Butter Temperature: Make sure butter is softened, not melted, for perfect creaming and structure.
- Don’t Overmix Flour: Mix just until flour disappears to keep your cookies tender and soft.
- Roll in Sugar: Don’t skip rolling the dough in granulated sugar—it creates a slight crisp shell that contrasts beautifully with the soft inside.
- Insert Kisses ASAP: Press the chocolate in right out of the oven to soften it without cracking the cookie.
How to Serve Peanut Butter Blossoms Cookies Recipe
Garnishes
I usually keep it classic—just that iconic Hershey’s Kiss on top. But occasionally, I dust with a pinch of powdered sugar for a snowy, festive look that’s perfect for holiday gatherings.
Side Dishes
These cookies pair wonderfully with a cold glass of milk (classic, right?). I also enjoy serving them alongside a simple bowl of mixed berries or a cup of hot coffee for a cozy treat spread.
Creative Ways to Present
For parties, I like to arrange them on a tiered cookie stand—those layers of chocolate-topped cookies are so inviting. Wrapping small stacks in cellophane tied with twine makes them perfect homemade gifts that everyone loves.
Make Ahead and Storage
Storing Leftovers
Store your baked Peanut Butter Blossoms in an airtight container at room temperature, separated by parchment paper to keep them from sticking together. They stay soft and chewy for up to a week, though they rarely last that long at my house!
Freezing
I often freeze the raw dough balls on a baking sheet, then transfer them to a freezer bag. When you’re ready, bake directly from frozen—just add a minute or two to the baking time. It’s an easy way to have fresh cookies on demand.
Reheating
Leftover cookies warm up beautifully in the microwave for about 10 seconds—this softens the chocolate kiss and brings back that just-baked freshness. Just be careful not to overheat or they'll get too soft.
Frequently Asked Questions:
Absolutely! Crunchy peanut butter adds a nice texture contrast, but be mindful it can slightly change the dough’s moisture. You might want to reduce milk just a bit if the dough feels too wet.
You can substitute with mini chocolate chips, small chocolate candies, or even a dollop of chocolate spread. Just add the chocolate immediately out of the oven to get that soft, melty effect.
Make sure your butter is softened but not melted, and chill the dough briefly if your kitchen is warm. Also, spacing the dough balls at least two inches apart helps them bake evenly without merging.
Yes! Use a gluten-free all-purpose flour blend with xanthan gum to mimic the texture of regular flour. The cookies will still turn out soft and delicious, though the texture might vary slightly.
Final Thoughts
This Peanut Butter Blossoms Cookies Recipe has been my go-to for everything from casual afternoons to holiday cookie exchanges. It’s simple, nostalgic, and endlessly adaptable. When you try it, you’ll get that perfect chewy peanut butter cookie with a gooey chocolate hug on top that will bring smiles around your kitchen.
Print
Peanut Butter Blossoms Cookies Recipe
- Prep Time: 20 minutes
- Cook Time: 13 minutes
- Total Time: 33 minutes
- Yield: 40 cookies
- Category: Dessert
- Method: Baking
- Cuisine: American
- Diet: Vegetarian
Description
This Easy Peanut Butter Blossoms recipe features soft and chewy classic peanut butter cookies topped with a chocolate Hershey's Kiss. Perfect for a nostalgic treat that blends the rich flavor of peanut butter with the sweetness of chocolate.
Ingredients
Cookies
- ½ cup unsalted butter, softened (113 g)
- ¾ cup creamy peanut butter (213 g)
- ¾ cup light brown sugar, packed (138 g)
- ¼ cup granulated sugar (50 g), plus additional for rolling
- 1 teaspoon vanilla extract (5 ml)
- 1 large egg
- 1 tablespoon milk (15 ml)
- ½ teaspoon baking soda
- ¼ teaspoon salt
- 1 ¾ cup all-purpose flour (248 g)
Topping
- 40 Hershey's Kisses (or a few more)
Instructions
- Preheat Oven and Prepare Baking Sheets: Preheat your oven to 350°F. Line two cookie sheets with silicone baking mats or parchment paper to prevent sticking and ensure even baking.
- Cream Butters and Sugars: In a large bowl, place the softened butter and creamy peanut butter. Using a hand mixer or stand mixer, blend until combined. Add the light brown sugar and granulated sugar, then beat until the mixture is smooth and creamy.
- Add Wet Ingredients: Mix in the large egg, vanilla extract, and milk on medium speed until fully combined, creating a smooth batter.
- Add Dry Ingredients: Stir in the baking soda and salt. Slowly add the all-purpose flour, mixing just until the dough is smooth and comes together. Scrape the sides of the bowl to ensure even mixing.
- Prepare Dough Balls: Fill a bowl with about ½ cup of granulated sugar for rolling the dough balls. Scoop tablespoon-sized portions of dough, roll each ball in the granulated sugar, and place them 2 inches apart on the prepared cookie sheets.
- Unwrap Kisses and Bake: While baking, unwrap the Hershey’s Kisses. Bake the cookies for 13 minutes or until the edges are just golden brown and the tops are no longer glossy.
- Add Chocolate Kiss: Immediately after removing the cookies from the oven, press a Hershey's Kiss into the center of each cookie so it adheres.
- Cool and Serve: Allow the cookies to cool on the baking sheets before transferring them to a wire rack or serving plate.
Notes
- These cookies are best enjoyed once fully cooled to allow the chocolate kisses to set properly.
- You can substitute creamy peanut butter with natural peanut butter for a more intense flavor, but the texture may vary slightly.
- If you prefer a crunchier cookie, bake 1-2 minutes longer, but watch closely to avoid overbrowning.
- Use parchment paper or silicone baking mats to prevent cookies from sticking and ensure easier cleanup.
- Store cookies in an airtight container at room temperature for up to 5 days or freeze for longer storage.
Nutrition
- Serving Size: 1 cookie
- Calories: 152 kcal
- Sugar: 9 g
- Sodium: 122 mg
- Fat: 8 g
- Saturated Fat: 3 g
- Unsaturated Fat: 5 g
- Trans Fat: 0 g
- Carbohydrates: 17 g
- Fiber: 1 g
- Protein: 3 g
- Cholesterol: 17 mg


Leave a Reply